Sunday, November 29, 2015

Saturday, November 14, 2015
Thursday, November 05, 2015

Friday, October 30, 2015
adb adb.exe
10 operaciones útiles para Android (vía ADB)
10 operaciones útiles para Android vía ADB como copiar archivos, instalar o desinstalar aplicaciones o conectar vía WiFi.
Con el SDK de Android, Java, y los drivers correspondientes instalados en nuestro sistema (Windows, Linux o Mac) tendremos un conjunto de herramientas interesantes para utilizar con nuestro términal.
Si no tienes o no estás seguro de tener correctamente instalados estos tres puntos, antes de continuar, lee las instrucciones en el artículo Preparar el SDK para hacer capturas de pantalla y logs.
Para algunas de estas operaciones será necesario tener acceso root.
Para algunas de estas operaciones será necesario tener acceso root.
Entre las múltiples utilidades que ofrece el SDK, existe una particularmente útil: ADB(Android Debug Bridge), que es algo así como un intermediario entre nuestro sistema operativo y nuestro terminal Android.
Con él se pueden realizar varias tareas, como veremos a continuación, de una forma sencilla y rápida, con sólo conectarlo al USB.
NOTA: La utilidad ADB.EXE está ubicada en la carpeta tools del SDK, por lo que necesitarás estar en esa carpeta. Una buena idea es añadir esta carpeta al PATH del sistema, para no tener que encontrarte ahí necesariamente.
1. Comprobar dispositivos conectados
Un buen punto para empezar, sería el de comprobar si realmente nuestro sistema ha detectado el terminal al conectarlo al USB. Escribimos:
adb devices
Esto debería mostrarnos una lista de los terminales Android conectados al sistema (físicos, emuladores, etc...):
List of devices attached

HT999KF99999    device
En este caso, el dispositivo HT999KF99999 ha sido detectado. Al lado nos muestra el estado del dispositivo (device = conectado, offline = desconectado, etc...).
¿Y en el caso de que tuvieramos varios dispositivos? ¿Todas las acciones que realicemos se harían en todos los dispositivos? Fácil, solo hay que especificar el parámetro -s y el número de serie del dispositivo, seguido por el comando u operación a realizar:
adb -s HT999KF99999 [...]
NOTA: Si no queremos estar escribiendo siempre esos parámetros porque vamos a usar siempre ese dispositivo, podemos establecer una variable de entorno ANDROID_SERIAL con el número de serie.
2. Conectar Android al PC vía WIFI (sin USB)
Otra cuestión bastante útil es la de realizar tareas con el móvil (O incluso enviar ficheros) a través de WIFI, sin necesidad de tener el terminal conectado al USB.
Para ello, lo conectamos al USB para configurarlo:
adb shell setprop service.adb.tcp.port 4444

adb tcpip 4444
Establecemos un puerto TCP para realizar la conexión. En este ejemplo hemos utilizado el puerto 4444/TCP. Acto seguido, obligamos al terminal a reiniciarse en modo conexión víaTCP/IP. Nos mostrará un mensaje similar a este:
restarting in TCP mode port: 4444
Obviamente, debemos estar conectados a una red WiFi, ya que vía GPRS/3G no es posible conectarnos (y no sería recomendable). Si no sabemos la IP privada que tenemos en nuestro terminal, escribimos lo siguiente:
adb shell getprop | findstr ipaddress
Lo que nos devolverá algo similar a lo siguiente, que es la IP del terminal adquirido vía DHCP.
[dhcp.tiwlan0.ipaddress]: [192.168.0.3]
Ahora ya podemos desconectar el terminal del USB. Con esa IP y el puerto TCP, podemos realizar una conexión:
adb connect 192.168.0.3:4444
Lo que debería devolver el siguiente mensaje:
connected to 192.168.0.3:4444
Cuando queramos volver a utilizar el modo normal, escribimos:
adb usb
Y ya podemos conectarlo al USB.
Si todo esto te parece demasiado complicado, recientemente han publicado una aplicación llamada adbWireless, de la que hablan en El Androide Libre.
3. Copiar archivos al terminal
Copiar archivos al terminal es muy sencillo. La sintaxis es la siguiente:
adb push c:\texto.txt /sdcard/texto.txt
El segundo parámetro (c:\texto.txt) indica el fichero que queremos copiar (origen). Como es lógico, podemos obviar la ruta si tenemos el archivo en nuestra carpeta actual.
El tercer parametro es la ruta donde se va a copiar el archivo (destino). Como también es lógico, podemos obviar el nombre del fichero si queremos que conserve el mismo nombre.
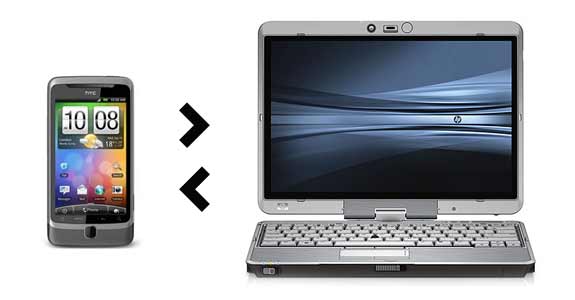
En este caso lo estamos copiando a la carpeta sdcard que normalmente es donde se almacenan los datos de la tarjeta SD. También remarcar que esta forma de copiar no necesita montar la tarjeta en Windows, ya que funciona vía directa por ADB.
4. Copiar archivos desde el terminal
De forma análoga al anterior, también existe una forma de copiar ficheros desde el móvil a nuestro PC:
adb pull /data/app/com.emezeta.budaphone.apk c:\
Como segundo parametro tenemos la ruta del fichero de aplicación BudaPhone. Esta ruta puede cambiar dependiendo del terminal y/o la ROM que tengamos.
Como tercer parámetro, tendríamos la ruta donde queremos que se guarde. Se puede utilizar un . (punto) para indicar que se guarde en la ruta actual.
Si quieres tener más destreza en el manejo de comandos similares, te aconsejo que le eches un vistazo al artículo 10 comandos para trabajar en Linux.
5. Examinar info de depuración (aka logcat)
Un recurso valiosísimo para los programadores (y para todo aquel que quiera depurar o descubrir motivos de errores) es el de poder acceder al logcat de Android.
El logcat es un fichero de registro donde se guarda todo lo que ocurre en nuestro móvil: errores, problemas, advertencias e incluso avisos. Podemos ver los últimos mensajes con un sencillo:
adb logcat
Sin embargo, la potencia de este comando está en sus filtros y parámetros:
adb logcat dalvikvm:D *:S
Muestra los mensajes de depuración de la máquina virtual Dalvik, silenciando el resto.
Hay varios niveles más, detallados al final del artículo capturas de pantalla y log de registro en Android. Incluso, utilizando el parámetro -v es posible formatear con cierta información relevante:
adb logcat -v process
Que muestra la información con un mensaje previo con información acerca del PID del proceso que lo efectuó. O, entre otros, información sobre el momento exacto (timestamp) de cuando ha ocurrido:
adb logcat -v time6. Instalar aplicaciones
Una opción muy interesante para aquellos que trasteamos mucho con aplicaciones (y sobretodo para desarrolladores) es la de instalar ficheros apk (aplicaciones) directamente desde la terminal de nuestro PC.
Esto nos da varias ventajas. En primer lugar podemos tener almacenada una amplia biblioteca de aplicaciones e instalarlas a un sólo golpe de teclado, sin necesidad de ir paso a paso por el Market (sobre todo si se trata de varias aplicaciones).
Si quieres una aplicación para hacer copia de seguridad de tus aplicaciones, te recomiendo echar un vistazo a Android Commander
En segundo lugar, tenemos la posibilidad de instalar aplicaciones que no estén presentes en el Market, o sin necesidad de subirlas para utilizarlas.
adb install aplicacion.apk
Con este sencillo comando bastará. Adb hará el resto. También es posible utilizar los siguientes parámetros:
adb install -r facebook.apk
Reinstala la aplicación de Facebook, sin eliminar los datos de la misma.
adb install -s angrybirds.apk
Instala la aplicación en la tarjeta SD en lugar de guardarla en el teléfono, útil para terminales antiguos con poco espacio o para usuarios con demasiadas aplicaciones y quieren utilizar la tarjeta SD para ese fin.
7. Desinstalar aplicaciones
Si es posible instalar aplicaciones, también lo será desinstalar. Sólo que en este caso, no se especifica el fichero apk, sino el nombre del producto:
adb uninstall com.emezeta.mzspray
Muy útil para desinstalar rápidamente y de un plumazo, si hemos estado probando variasaplicaciones divertidas para probarlas.
También es posible, desinstalar la aplicación sin eliminar los datos de la misma, con el parámetro -k.
8. Reiniciar el dispositivo
Si necesitamos reiniciar nuestro terminal, es muy sencillo hacerlo desde ADB:
adb reboot
Además, podemos seleccionar dos tipos de reinicios adicionales:
adb reboot bootloader
Bootloader es el cargador principal de Android, desde donde se pueden realizar varias operaciones con respecto al funcionamiento del terminal (cambio de firmware, etc...).
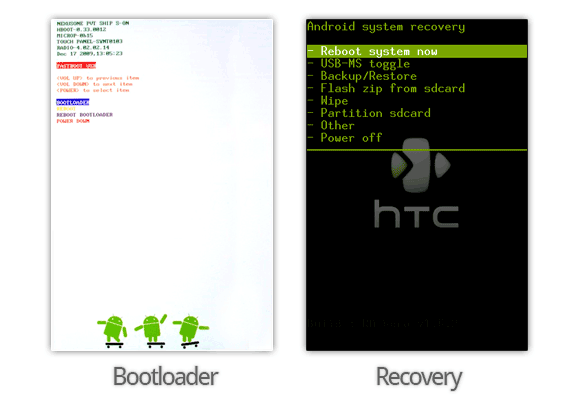
adb reboot recovery
Recovery es una especie de panel de recuperación, desde el cuál se pueden realizar tareas varias de recuperación, como puede ser particionamiento, wipes, flasheo, etc...
NOTA: No reiniciar en estos modos si no se sabe lo que se está haciendo. Se pueden realizar cambios que dejen al sistema operativo en un estado no funcional.
9. Remontar la partición del sistema
Otra de las tareas útiles, para aquellos que quieren adentrarse en el mundo del funcionamiento de Android es el de volver a montar la partición de sistema de Android con permisos de lectura y escritura, ya que en principio, sólo tiene permisos de lectura.
adb remount
Esto permitirá realizar cambios de escritura en la partición /system.
10. Ejecutar comandos en el entorno Android
Puesto que Android funciona con una base de kernel de Linux, es posible lanzar comandos en la terminal propia de android. Para ello podemos abrir una consola con el siguiente comando:
adb shell
O lanzar comandos directamente:
adb shell [comando]
Esto abre un amplio abanico de posibilidades (sobre todo para usuarios root) a los que propongo empezar con unos sencillos, para ir conociendo el sistema:
adb shell df -h
Que nos mostrará las particiones montadas y el espacio libre, entre otros datos. O por otra parte:
adb shell ls -lh /Thursday, October 22, 2015
links
language
http://www.guidetojapanese.org/blog/2006/08/12/which-is-harder-japanese-or-korean/
TANGRAM
http://www.juegotangram.com.ar/IDS/EN/index.htm
Singularity
http://singularityu.org
http://www.guidetojapanese.org/blog/2006/08/12/which-is-harder-japanese-or-korean/
TANGRAM
http://www.juegotangram.com.ar/IDS/EN/index.htm
Singularity
http://singularityu.org
Friday, October 16, 2015
Commands Windows shell
Think of Vista's Shell as a special engine room. To that thought add the concept 'command', as in command line, or 'dos box'. Now all that you need for action is the name of the folder object, for example shell:sendto.
Get Started with Shell:SendTo
If you right-click a file, from the drop-down menu you have the option to SendTo a select group of folders. Now, you may wish to add more locations to this SendTo list. Strangely, normal explorer techniques won't give you access to the SendTo folder, this is a job for Vista's command, shell:sendto
Click on the Vista Start button
Click in the Start Search dialog box
Type -> shell:sendto
Click in the Start Search dialog box
Type -> shell:sendto
Result: Vista launches the Windows Explorer shell at the SendTo folder. You are now in a position to add more shortcuts to the SendTo folder.
The command Shell:xyz acts as a shortcut to the folder you wish to find quickly, you just have to remember the key names to substitute for xyz.
More Shell:Commands
shell:cookies
shell:nethood
shell:PrintersFolder
shell:System
shell:nethood
shell:PrintersFolder
shell:System
Incidentally, my friend 'Barking' Eddie has been amused by this shell command:
shell:SystemCertificates
shell:SystemCertificates
?
Avoid the Space Trap
Shell:sendto is correct - no space
Shell: sendto is wrong - you don't need a space
Shell :sendto does not work either, there must be no spaces.
Shell: sendto is wrong - you don't need a space
Shell :sendto does not work either, there must be no spaces.
Are the shell commands case sensitive? No not all, just avoid that space. These Vista Shell:Commands are merely a specialist way of accessing key folders. You could find the very same information through Windows Explorer or by launching the Control Panel and drilling down through the sub-menus.
Full list of Vista Shell:Commands
AddNewProgramsFolder
Administrative Tools
AppData
AppUpdatesFolder
Cache
CD Burning
ChangeRemoveProgramsFolder
Common Administrative Tools
Common AppData
Common Desktop
Common Documents
Common Programs
Common Start Menu
Common Startup
Common Templates
CommonDownloads
CommonMusic
CommonPictures
CommonVideo
ConflictFolder
ConnectionsFolder
Contacts
ControlPanelFolder
Cookies
CredentialManager
CryptoKeys
CSCFolder
Default Gadgets
Desktop
Downloads
DpapiKeys
Favorites
Fonts
Gadgets
Games
GameTasks
History
InternetFolder
Links
Local AppData
LocalAppDataLow
LocalizedResourcesDir
MAPIFolder
My Music
My Pictures
My Video
MyComputerFolder
NetHood
NetworkPlacesFolder
OEM Links
Original Images
Personal
PhotoAlbums
Playlists
PrintersFolder
PrintHood
Profile
ProgramFiles
ProgramFilesCommon
ProgramFilesCommonX86
ProgramFilesX86
Programs
Public
PublicGameTasks
Quick Launch
Recent
RecycleBinFolder
ResourceDir
SampleMusic
SamplePictures
SamplePlaylists
SampleVideos
SavedGames
Searches
SendTo
Start Menu
Startup
SyncCenterFolder
SyncResultsFolder
SyncSetupFolder
System
SystemCertificates
SystemX86
Templates
TreePropertiesFolder
UserProfiles
UsersFilesFolder
Windows
Administrative Tools
AppData
AppUpdatesFolder
Cache
CD Burning
ChangeRemoveProgramsFolder
Common Administrative Tools
Common AppData
Common Desktop
Common Documents
Common Programs
Common Start Menu
Common Startup
Common Templates
CommonDownloads
CommonMusic
CommonPictures
CommonVideo
ConflictFolder
ConnectionsFolder
Contacts
ControlPanelFolder
Cookies
CredentialManager
CryptoKeys
CSCFolder
Default Gadgets
Desktop
Downloads
DpapiKeys
Favorites
Fonts
Gadgets
Games
GameTasks
History
InternetFolder
Links
Local AppData
LocalAppDataLow
LocalizedResourcesDir
MAPIFolder
My Music
My Pictures
My Video
MyComputerFolder
NetHood
NetworkPlacesFolder
OEM Links
Original Images
Personal
PhotoAlbums
Playlists
PrintersFolder
PrintHood
Profile
ProgramFiles
ProgramFilesCommon
ProgramFilesCommonX86
ProgramFilesX86
Programs
Public
PublicGameTasks
Quick Launch
Recent
RecycleBinFolder
ResourceDir
SampleMusic
SamplePictures
SamplePlaylists
SampleVideos
SavedGames
Searches
SendTo
Start Menu
Startup
SyncCenterFolder
SyncResultsFolder
SyncSetupFolder
System
SystemCertificates
SystemX86
Templates
TreePropertiesFolder
UserProfiles
UsersFilesFolder
Windows
Friday, September 25, 2015
PXE boot server
http://www.rmprepusb.com/tutorials
76 - Quickly setup PXE booting to install any Windows OS or PXE boot linux, etc. with SERVA!
 Other Tutorials you might like:
also checkout this free PXE software from Aomei Technology - easy to setup up but only supports one boot image at any one time. (thanks to 'Jack' for the heads up on this one!).
Introduction
A new utility has just appeared which makes installing Windows XP, 2003, Vista, Win 7, Win 8 or Win 2K8 via PXE very easy!
It is called Serva and can be found here. It does NOT require the Windows WAIK to be installed and is quite a small download - with it you can set up a RIS and WDS server on your Windows PC and you don't need to even touch any existing DHCP server or router!
The instructions are easy to follow, but here is what I did to get PXE booting and a Windows 7 install going in just 5-15 minutes!
Note: proxyDHCP PXE booting is explained here: http://blogs.technet.com/b/dominikheinz/archive/2011/03/18/dhcp-amp-pxe-basics.aspx My Setup
I have a typical home network - an ADSL router which has four Ethernet ports (and a wireless aerial) and a Windows 7 PC. The target PXE boot PC was an Asus netbook.
Windows PC <------> Dlink ADSL router + 4 port hub <-------> any other PXE-boot capable computer
(Win 7 + Serva PXE & TFTP Server) (PXE client)
 <-- color="#9900ff" font="" size="4">----------------> <-- color="#9900ff" font="" size="4">----------------> |
 <------------------>
Quick How To
1. Download Serva from the Serva website (the non-supporter version is free)
2. Run the download to unpack the files and copy the Serva files to any convenient folder on your Windows hard disk (you might like to make a link on your Desktop to the exe)
3. Create a C:\SERVA_ROOT empty folder
4. Run Serva.exe and click on the Settings button at the bottom (if you get a Windows FireWall warning then ALLOW the program access through the firewall)
5. Click on the TFTP tab and set the Root directory to C:\SERVA_ROOT and tick the TFTP Server box as shown below:

6. Click on the DHCP tab and set proxyDHCP (if you already have a DHCP server or DHCP router) and tick the BINL box.

7. Quit the app and re-run the Serva.exe app again. This is necessary because when Serva re-starts it will generate the PXE download files according to what folders you have created. Serva only does this when it starts. If you make any changes to the folders under C:\SERVA_ROOT then you should always quit and re-run Serva before you try a PXE boot.
8. Check that there are now some folders underneath the C;\SERVA_ROOT folder
9. Set up a Windows share to the C:\SERVA_ROOT\WIA_WDS folder and after that, use the Windows Advanced Properties dialogue (click on the folder and then clickProperties - Sharing) to set access for Everyone and set the Share name to WIA_WDS_SHARE.
10. Copy the contents of your Windows 7 (or Win8 or Vista or Server 2K8R2) DVD to a new folder - e.g. copy a Win 7 SP1 32-bit install DVD toC:\SERVA_ROOT\WIA_WDS\Win7_32_SP1
11. If you have more DVDs, just make a new folder for each of them under C:\SERVA_ROOT\WIA_WDS
12. If you have NT OS source files (e.g. 2003, XP or Server2K8 non-R2) then put these under C:\SERVA_ROOT\WIA_RIS and share the C:\SERVA_ROOT folder asWIA_RIS_SHARE (see doc on website). Make sure "Everyone" group has read permission on the just created share. You also need to set a Null Session share on the C:\SERVA_ROOT folder.
13. Quit the Serva app and re-run it
14. Now try to PXE boot your target system
15. For a WDS install (Vista, Win7,Win8, SVR2K8R2), you will be prompted for a username and password - use your host PC computername\username and password - e.g. mynewHP\Administrator myhppwd.
That's it - now try to PXE boot a system over Ethernet.
I would recommend using a Windows 7 or 8 32-bit install folder (copy of the install DVD) to start with as these will have the most network drivers in them already and will work on any CPU. The troubleshoooting documentation on the Serva website explains how to add OS network drivers if the standard Microsoft install files do not already contain the correct network driver for your target systems.
Troubleshooting
- After connecting the network cable, watch the Windows SystemTray network icon - wait until the icon animation has stopped (usually 1-2 minutes) before you attempt to start Serva.
- If you having problems, try disabling the Windows Firewall on your PC and temporarily stopping your Anti-Virus protection,.
- If you are using a router as a hub, disconnect any other Ethernet cable except for the target PXE system and your Serva Windows PC.
- Try a different PXE client notebook or PC - some PXE BIOSes are buggy (not all PXE BIOS ROMs support proxyDHCP PXE booting)!
- If it starts to load the OS installation files and then stops with an error message - see here.
- If you are installing XP and you just see the black screen with the XP logo, make sure you have set up the Share on the C:\SERVA_ROOT folder correctly and followed the Null Session share instructions.
- If the client is having communication problems with the Serva host PC (e.g. PXE client is not receiving the DHCP offer or lots of timeouts, etc.) try switching off and on your router - if still no joy, switch off your host PC, client PC and router. Then switch on the router, wait 1 minute and the switch on your host PC. Now try again!
Note: grldr and grub.exe will not work if the PXE server is using proxyDHCP mode. Grub4dos does not currently support this feature. To use grub4dos your PXE server must also be the DHCP server (i.e. do not use proxyDHCP mode and disable your DHCP server services whilst Serva is running).
Use Oracle VM VirtualBox to PXE boot from Serva
You can PXE boot using Oracle VM Virtual Box to test that PXE booting is working.
1. Add a new Virtual machine which has a virtual hard disk that you can install the OS onto.
2. Set up the Network Adapter to Bridged and set the Name to the physical network adapter on your host system (see below).

3. Run the VM and press F12 to get the BIOS boot option menu:

Press L to boot from the LAN. You should then see the Serva menu if PXE booting was successful:

You can now install XP or Win7 to your virtual hard disk (if you wish).

Monday, September 21, 2015
R&B + jartadas
C+C Music Factory - Gonna make you sweat (1991)
"everybody dance now"
Black Box - Ride on time (1989)
Marky Mark and The Funky Bunch - Good Vibrations (D-JOG)
Technotronic - Pump Up The Jam
Salt-N-Pepa - Push It
Diana King - Shy Guy
Alexia - Uh la la la
Haddaway - What is love
Alexia - Number One
bakala
Xque - Pastis y Buenri sesión 1998
Rebeca - Duro de Pelar
Xavi Metralla - Diabolica (pont aeri)
Safri Duo - Played-A-Live
David Tavare - Hot Summer Night
Amanda Lear - Queen of Chinatown 1977
Saturday, September 19, 2015
HCF
THE INCREDIBLE TRUE STORY BEHIND AMC’S HALT AND CATCH FIRE – HOW COMPAQ CLONED IBM AND CREATED AN EMPIRE


An Interview With Compaq Co-Founder and CEO Rod Canion
This Sunday, AMC is premiering a new original series called Halt And Catch Fire. Set in the early 1980s, it tells the story of a band of cowboy entrepreneurs and engineers who join the PC Wars by cloning an IBM machine and taking on Big Blue for control of the nascent personal computer industry.
 AMC’s show is fictional, but it turns out, there is a true life story that is similar to this course of events, and it led to the creation of one of the greatest technology companies of all time, Compaq Computers.
Rod Canion was one of the co-founders of Compaq back in the early 80s, and he was there for the real world PC wars. He’s written a book about the time period, Open: How Compaq Ended IBM’s PC Domination and Helped Invent Modern Computing . In the interview below, I spoke to Rod about the book, the process of taking on Big Blue and cloning the IBM-PC, and how a series of incredible calculated gambles paid off to eventually build one of history’s most successful technology companies.
. In the interview below, I spoke to Rod about the book, the process of taking on Big Blue and cloning the IBM-PC, and how a series of incredible calculated gambles paid off to eventually build one of history’s most successful technology companies.
You can listen to the whole interview at the bottom of this post, or just read this lightly edited (and heavily compressed) summation of the story below.

Rod Canion
Back in 1981…
Rod Canion, Jim Harris and Bill Murto were mid-level managers at Texas Instruments. Converts to the still nascent personal computer revolution, the trio decided to strike off on their own and form a company to produce a product in an entirely new category of PC: the portable. Portable PC’s were not laptops because the technology did not exist yet to make computers that small and light. Portables were designed to be moved from desk to desk easily, were rugged enough to travel with, and at around 30 pounds or so, had the form factor of a large-ish suitcase.
The first mass-produced portable computer was the Osbourne 1, which had come out earlier in the year. The Kaypro was also an early pioneer in this category, but both systems had their own unique and proprietary architecture, which limited their popularity and adoption. The computer industry had been transformed by the introduction of the IBM-PC in August of 1981. The imprimatur of the IBM brand was enough to convince millions of people to join the micro-computer revolution and the IBM-PC soon became the best-selling computer in the world.
And so, the trio from Texas Instruments had decided that their big idea would be to create the first portable that was compatible with the IBM-PC.
Rod Canion, from the interview:
It was one of those things that I literally felt a chill down my spine. The idea came together because it was really a combination of things that made it work. The idea for a portable computer–there were a number of those already in the market–the only reason we were actually even looking into that area was because (…) the first idea we had had, the venture capitalists decided not to fund it.(…)The morning of January the 8th, 1982 (…) I was going over the idea of a portable computer. How could we make one that was differentiated enough to make it worthwhile? (…) Not being able to get software developed for it was a killer. (…) Every computer ran different software. There were literally somewhere close to 300 different computer companies making new computers at the time. (…) That morning, the idea hit me that, what if we could make our computer run software that already was out there? That is, run the software for the product that was getting the most software and always getting the software first when the new one came out, and that was the IBM-PC.
Because the IBM-PC was so popular, most developers programmed for the PC first, and all the best applications and programs could be found on the PC. But because IBM had famously rushed the PC to market, its system was made up of off-the-shelf components and software. Anyone could purchase the same off-the-shelf hardware and software and “clone” an IBM-PC.
Again, Rod Canion:
Because IBM had done something they had never done before, which was bring a computer to market that wasn’t just totally protected from the copying standpoint. We didn’t want to copy their computer! We wanted to have access to the software that was written for their computer by other people.
The idea was to create a computer that was mostly like IBM-PC and mostly ran all the same software, but sold at a cheaper price point. The first company to pursue this strategy was Columbia Data Products, followed by Eagle Computer. But soon, most of the big names in the young computer industry (Xerox, Hewlett-Packard, Digital Equipment Corporation, Texas Instruments, and Wang) were all producing PC clones.
But all of these machines were only mostly PC-compatible. So, at best, they were DOS compatible. But there was no guarantee that each and every program or peripheral that ran on the IBM-PC could run on a clone. The key innovation that Canion, Harris and Murto planned to bring to market under the name Compaq Computer Corporation would be a no-compromises, 100% IBM-PC compatibility. This way, their portable computer would be able to run every single piece of software developed for the IBM-PC. They would be able to launch their machine into the largest and most vibrant software ecosystem of the time, and users would be able to use all their favorite programs on the road.
We couldn’t have done it if IBM hadn’t done exactly what they did because nobody else… Apple certainly wouldn’t have stood for us to make a product that ran their software. They had enough protection on it to prevent that, as did all the others. IBM–the best one to pick–also happened to be the only one that wasn’t protected and it was because of this sort of strange thing. They didn’t believe much in the market, they just rushed a one-year project to get to market.
Compaq lined up venture financing–most famously from a young John Doerr at Kleiner Perkins. With this money, they quickly hired as many young programmers and engineers as they could, being careful not to poach from or anger their former employer. The key to cloning the IBM-PC was to reverse engineer the BIOS, which was the one piece of the machine that was proprietary IBM technology. But that was a tricky proposition. The BIOS had been published in the user manual, but anyone who had even looked at the BIOS code couldn’t work on rewriting it for fear of tainting the project. Running afoul of IBM’s intellectual property would doom the project.
There were actually a few companies that went in and just started copying out of the manual and they ended up getting sued and shut down.(…)We knew there was a way to do it. We believed we could do it legally. We didn’t just assume things. We hired the best intellectual property attorneys we could find and used their strict guidance to help us do the reverse engineering very carefully.(…)What our lawyers told us was that, not only can you not use it [the copyrighted code] anybody that’s even looked at it–glanced at it–could taint the whole project. (…) We had two software people. One guy read the code and generated the functional specifications. So, it was like, reading hieroglyphics. Figuring out what it does, then writing the specification for what it does. Then, once he’s got that specification completed, he sort of hands it through a doorway or a window to another person who’s never seen IBM’s code, and he takes that spec and starts from scratch and writes our own code to be able to do the exact same function.
With a small team and a budget that was an infinitesimal fraction of IBM’s yearly revenues, the Compaq team succeeded in their task in 9 short months.
In November of 1982, the Compaq Portable was launched as the first 100% PC compatible machine in the world. Compaq’s machine was so good, in fact, that it proved to be more compatible–especially more backwards-compatible with older software and peripherals–than IBM’s own machines were. One reviewer said that Compaq was more IBM compatible than even IBM was.
[We had] just a bull-headed commitment to making all the software run. We were shocked when we found out none of our competitors had done it to the same degree. We could speculate on why they had stopped short of complete compatibility: It was hard. It took a long time. And there was a natural rush to get to market. People wanted to be first. There was only one thing for us: we didn’t have a product if we couldn’t run the IBM-PC software. And if you didn’t run all of it, how would anyone be confident enough to buy your computer, if they didn’t know they were always going to be able to run new software? We took it very, very seriously.
The Compaq Portable was immediately and wildly successful. In its first year of sales, Compaq sold 53,000 machines, generating sales of $111 million and making Compaq the fastest start-up to hit the $100 million mark, that quickly in its existence. IBM eventually launched a portable of it’s own, but again, the Compaq models proved to be more compatible, as well as more rugged and reliable. Compaq machines eventually outsold IBM portables 10-to-1.
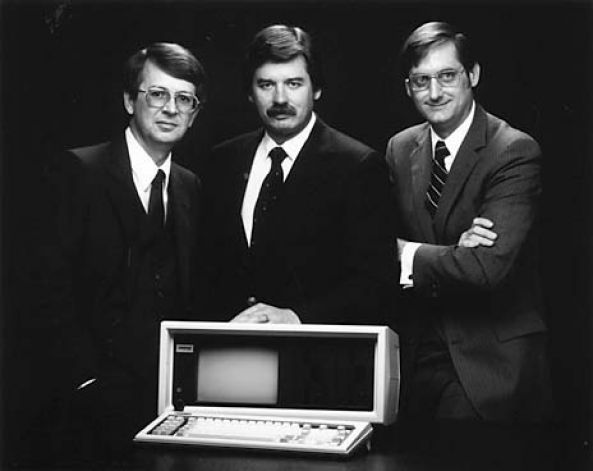
Rod Canion, Jim Harris and Bill Murto
Flush with this success, Compaq attacked IBM on its own turf, launching a range of full-functioning desktop computers. When IBM was slow to embrace Intel’s next generation 386 chip, Compaq seized the moment and launched the first 386 system, thereby leaping to the head of the technological pack. Building off its cloning strategy, Compaq was a leader in moving the computer industry to a new standard, based upon the original IBM-PC paradigm, but no-longer led by IBM. When IBM retrenched and tried to enact a closed, proprietary system with the PS/2 line, Compaq led the way in defending the clone model that IBM was attempting to eradicate. Instead of the “IBM standard” computers moved toward the “industry standard” that became the PC we remember from the late 80s and early 90s. This standard is largely remembered as the “Wintel” duopoly (for Windows software and Intel chips) but a forgotten third leg of this stool is Compaq, which did more than any other manufacturer to ensure the survival and dominance of the industry standard model that had grown out of the IBM-PC, but was no longer beholden to it.
We were really almost the magician in the back room guiding it [the industry]. (…) Backward-compatibility, that was the key technology to begin to stop IBM’s advance with their new PS/2. I mean, they sold millions of those. People look back now and say, “Oh, that was a bad idea.” Well, it was viewed as a great idea at the time! And was about to succeed. (…) All the other computer companies were buying licenses from IBM and beginning to build PS/2 compatibles. (…) It [was] gonna be an IBM-dominated and controlled ballgame. We couldn’t accept that.
Heck, as Rod points out, it’s a little known fact that the version of DOS that was eventually used on most 100% IBM compatible computers was a version that Compaq licensed back to Microsoft after reverse engineering that as well. So, it can be argued that Compaq played a forgotten but key role in Microsoft’s eventual rise to world domination.
It’s one of those strange things. We kept it secret because it seemed like it would just muddy the water for our competitors… for Microsoft. (…) There was a lot of interest in, well, let’s give this version back to Microsoft, and let it become their standard. From Microsoft’s standpoint, all of their computer companies that were using MS-DOS wanted a compatible version. (…) We were recognized as by-far the most compatible. So, we were giving Microsoft something their customers were asking for. So, we were able to license back to them… Microsoft does whatever they do with it and gets it ready to become their standard version of Microsoft [sic] and then begins to sell it to all the other computer companies.
It’s somewhat forgotten today, but Compaq was perhaps the biggest winner of the original PC wars. By 1986, it became the the youngest-ever firm to break into the Fortune 500. In 1987, Compaq hit the $1 billion revenue mark, becoming the fastest ever company to reach that milestone. By the late 90s and early 2000s, Compaq was the largest PC manufacturer in the world, before it was absorbed by Hewlett Packard. Today the Compaq brand is the lower-end representative of HP’s computer business. And IBM is no longer even a PC manufacturer.
Everybody always thinks of intellectual property as building an immovable wall that your competitors can’t come in. And that just wasn’t the way it worked in an industry standard environment. (…) When the industry standard began to develop, it threw a twist into it that nobody really got for a long time. Fortunately for Compaq, we “got it” because we were at the heart of it being created. (…) We were driving [the industry] instead of trying to figure out what was going on around us. And IBM never got that part of it.
One part of the history that AMC’s new show gets right is that in the early 80s, Texas really was a hub for technology innovation, especially in the PC manufacturing realm. Silicon Prairie is the cute branding term. How exactly did that happen?
You know, a lot of people have asked that question, and it’s hard to put your finger on it. (…) It dawned on me one day that, at the time, of the five companies that at one time had been in the top two or three PC companies… of the top five, three had been from Texas! Apple was from the west coast. IBM from the east coast. But the first one had been Tandy. They were the leader for a while before IBM came along. And then, Compaq came along. (…) And then Dell came along behind us, using the foundation we had built. (…) There’s a certain risk-taking gene almost that runs through a lot of Texans.
Is Rod planning on watching Halt And Catch Fire?
I have not looked at the whole episode. I’ve seen the trailer for it. I am gonna watch it. It looks pretty exciting. It may actually be as exciting as the real thing.
Listen To The Interview:
Rod’s Book
Trailer For Halt And Catch Fire
(Note: Since some have asked, just wanted to make it clear that I have not been paid or given consideration or in any way encouraged by AMC, Rod Canion or anyone else to do this episode and post. Just found it interesting and timely.)
Subscribe to:
Posts (Atom)