Saturday, July 23, 2016

google chrome ubuntu

Chromium

apt-get install chromium-browser

Chrome

wget -q -O - https://dl-ssl.google.com/linux/linux_signing_key.pub | sudo apt-key add - 

sudo sh -c 'echo "deb [arch=amd64] http://dl.google.com/linux/chrome/deb/ stable main" >> /etc/apt/sources.list.d/google-chrome.list'

apt-get update

apg-get install google-chrome-stable


Debian

apg-get install software-properties-common

...

Friday, April 29, 2016

dual boot w/l

You are now ready to start up the bcdedit tool and issue editing commands as follows:
  • Type the following carefully, including quote marks, spaces and upper case letters, followed by the enter key:

    bcdedit /create /d "Boot using Grub4DOS" /application BOOTSECTOR
  • Provided you have typed the instruction correctly, you will be told the operation was successful and you will be given a UUID for the new menu item. This will be something like:

    {e25f890c-2d84-11df-b4a8-d580eb35e514}

    The UUID you are given, including curly braces and hyphens, should be substituted for {Grub4DOS UUID} in all that follows.
  • Type the following carefully, including quote marks, spaces and upper case letters, followed by the enter key.
    Remember to substitute your given UUID for {Grub4DOS UUID}!

    bcdedit /set {Grub4DOS UUID} device partition=C:

    Provided you have typed the instruction correctly, you will be told the operation was successful.
  • Type the following carefully, including quote marks, spaces and upper case letters, followed by the enter key.
    Remember to substitute your given UUID for {Grub4DOS UUID}!

    bcdedit /set {Grub4DOS UUID} PATH \grldr.mbr

    Provided you have typed the instruction correctly, you will be told the operation was successful.
  • Type the following carefully, including quote marks, spaces and upper case letters, followed by the enter key.
    Remember to substitute your given UUID for {Grub4DOS UUID}!

    bcdedit /displayorder {Grub4DOS UUID} /addlast

    Provided you have typed the instruction correctly, you will be told the operation was successful.
  • Type the following carefully, including quote marks, spaces and upper case letters, followed by the enter key.
    Remember to substitute your given UUID for {Grub4DOS UUID}!

    bcdedit /timeout 13
Dual Boot Non traditional way


Sunday, March 20, 2016

Sunday, March 06, 2016

Tuesday, December 29, 2015

don't believe

Inna - Hot remix

Sonique - Sky   


MaxRiven - Rhythm Is a Dancer

Sunday, December 06, 2015

HEVC x265 vlc

VLC h265 h.265 x265 x.265 plugin

sudo add-apt-repository ppa:mc3man/trusty-media
sudo apt-get update
sudo apt-get install vlc-plugin-libde265

Thursday, November 05, 2015

Friday, October 30, 2015

adb adb.exe

10 operaciones útiles para Android (vía ADB)

10 operaciones útiles para Android vía ADB como copiar archivos, instalar o desinstalar aplicaciones o conectar vía WiFi.
Con el SDK de AndroidJava, y los drivers correspondientes instalados en nuestro sistema (Windows, Linux o Mac) tendremos un conjunto de herramientas interesantes para utilizar con nuestro términal.
Si no tienes o no estás seguro de tener correctamente instalados estos tres puntos, antes de continuar, lee las instrucciones en el artículo Preparar el SDK para hacer capturas de pantalla y logs.

Para algunas de estas operaciones será necesario tener acceso root.
Entre las múltiples utilidades que ofrece el SDK, existe una particularmente útil: ADB(Android Debug Bridge), que es algo así como un intermediario entre nuestro sistema operativo y nuestro terminal Android.
Con él se pueden realizar varias tareas, como veremos a continuación, de una forma sencilla y rápida, con sólo conectarlo al USB.
NOTA: La utilidad ADB.EXE está ubicada en la carpeta tools del SDK, por lo que necesitarás estar en esa carpeta. Una buena idea es añadir esta carpeta al PATH del sistema, para no tener que encontrarte ahí necesariamente.

1. Comprobar dispositivos conectados

Un buen punto para empezar, sería el de comprobar si realmente nuestro sistema ha detectado el terminal al conectarlo al USB. Escribimos:
adb devices
Esto debería mostrarnos una lista de los terminales Android conectados al sistema (físicos, emuladores, etc...):
List of devices attached
HT999KF99999 device
En este caso, el dispositivo HT999KF99999 ha sido detectado. Al lado nos muestra el estado del dispositivo (device = conectado, offline = desconectado, etc...).
¿Y en el caso de que tuvieramos varios dispositivos? ¿Todas las acciones que realicemos se harían en todos los dispositivos? Fácil, solo hay que especificar el parámetro -s y el número de serie del dispositivo, seguido por el comando u operación a realizar:
adb -s HT999KF99999 [...]
NOTA: Si no queremos estar escribiendo siempre esos parámetros porque vamos a usar siempre ese dispositivo, podemos establecer una variable de entorno ANDROID_SERIAL con el número de serie.

2. Conectar Android al PC vía WIFI (sin USB)

Otra cuestión bastante útil es la de realizar tareas con el móvil (O incluso enviar ficheros) a través de WIFI, sin necesidad de tener el terminal conectado al USB.
Para ello, lo conectamos al USB para configurarlo:
adb shell setprop service.adb.tcp.port 4444
adb tcpip 4444
Establecemos un puerto TCP para realizar la conexión. En este ejemplo hemos utilizado el puerto 4444/TCP. Acto seguido, obligamos al terminal a reiniciarse en modo conexión víaTCP/IP. Nos mostrará un mensaje similar a este:
restarting in TCP mode port: 4444
Obviamente, debemos estar conectados a una red WiFi, ya que vía GPRS/3G no es posible conectarnos (y no sería recomendable). Si no sabemos la IP privada que tenemos en nuestro terminal, escribimos lo siguiente:
adb shell getprop | findstr ipaddress
Lo que nos devolverá algo similar a lo siguiente, que es la IP del terminal adquirido vía DHCP.
[dhcp.tiwlan0.ipaddress]: [192.168.0.3]
Ahora ya podemos desconectar el terminal del USB. Con esa IP y el puerto TCP, podemos realizar una conexión:
adb connect 192.168.0.3:4444
Lo que debería devolver el siguiente mensaje:
connected to 192.168.0.3:4444
Cuando queramos volver a utilizar el modo normal, escribimos:
adb usb
Y ya podemos conectarlo al USB.
Si todo esto te parece demasiado complicado, recientemente han publicado una aplicación llamada adbWireless, de la que hablan en El Androide Libre.

3. Copiar archivos al terminal

Copiar archivos al terminal es muy sencillo. La sintaxis es la siguiente:
adb push c:\texto.txt /sdcard/texto.txt
El segundo parámetro (c:\texto.txt) indica el fichero que queremos copiar (origen). Como es lógico, podemos obviar la ruta si tenemos el archivo en nuestra carpeta actual.
El tercer parametro es la ruta donde se va a copiar el archivo (destino). Como también es lógico, podemos obviar el nombre del fichero si queremos que conserve el mismo nombre.
En este caso lo estamos copiando a la carpeta sdcard que normalmente es donde se almacenan los datos de la tarjeta SD. También remarcar que esta forma de copiar no necesita montar la tarjeta en Windows, ya que funciona vía directa por ADB.

4. Copiar archivos desde el terminal

De forma análoga al anterior, también existe una forma de copiar ficheros desde el móvil a nuestro PC:
adb pull /data/app/com.emezeta.budaphone.apk c:\
Como segundo parametro tenemos la ruta del fichero de aplicación BudaPhone. Esta ruta puede cambiar dependiendo del terminal y/o la ROM que tengamos.
Como tercer parámetro, tendríamos la ruta donde queremos que se guarde. Se puede utilizar un . (punto) para indicar que se guarde en la ruta actual.
Si quieres tener más destreza en el manejo de comandos similares, te aconsejo que le eches un vistazo al artículo 10 comandos para trabajar en Linux.

5. Examinar info de depuración (aka logcat)

Un recurso valiosísimo para los programadores (y para todo aquel que quiera depurar o descubrir motivos de errores) es el de poder acceder al logcat de Android.
El logcat es un fichero de registro donde se guarda todo lo que ocurre en nuestro móvil: errores, problemas, advertencias e incluso avisos. Podemos ver los últimos mensajes con un sencillo:
adb logcat
Sin embargo, la potencia de este comando está en sus filtros y parámetros:
adb logcat dalvikvm:D *:S
Muestra los mensajes de depuración de la máquina virtual Dalvik, silenciando el resto.
Hay varios niveles más, detallados al final del artículo capturas de pantalla y log de registro en Android. Incluso, utilizando el parámetro -v es posible formatear con cierta información relevante:
adb logcat -v process
Que muestra la información con un mensaje previo con información acerca del PID del proceso que lo efectuó. O, entre otros, información sobre el momento exacto (timestamp) de cuando ha ocurrido:
adb logcat -v time

6. Instalar aplicaciones

Una opción muy interesante para aquellos que trasteamos mucho con aplicaciones (y sobretodo para desarrolladores) es la de instalar ficheros apk (aplicaciones) directamente desde la terminal de nuestro PC.
Esto nos da varias ventajas. En primer lugar podemos tener almacenada una amplia biblioteca de aplicaciones e instalarlas a un sólo golpe de teclado, sin necesidad de ir paso a paso por el Market (sobre todo si se trata de varias aplicaciones).
Si quieres una aplicación para hacer copia de seguridad de tus aplicaciones, te recomiendo echar un vistazo a Android Commander
En segundo lugar, tenemos la posibilidad de instalar aplicaciones que no estén presentes en el Market, o sin necesidad de subirlas para utilizarlas.
adb install aplicacion.apk
Con este sencillo comando bastará. Adb hará el resto. También es posible utilizar los siguientes parámetros:
adb install -r facebook.apk
Reinstala la aplicación de Facebook, sin eliminar los datos de la misma.
adb install -s angrybirds.apk
Instala la aplicación en la tarjeta SD en lugar de guardarla en el teléfono, útil para terminales antiguos con poco espacio o para usuarios con demasiadas aplicaciones y quieren utilizar la tarjeta SD para ese fin.

7. Desinstalar aplicaciones

Si es posible instalar aplicaciones, también lo será desinstalar. Sólo que en este caso, no se especifica el fichero apk, sino el nombre del producto:
adb uninstall com.emezeta.mzspray
Muy útil para desinstalar rápidamente y de un plumazo, si hemos estado probando variasaplicaciones divertidas para probarlas.
También es posible, desinstalar la aplicación sin eliminar los datos de la misma, con el parámetro -k.

8. Reiniciar el dispositivo

Si necesitamos reiniciar nuestro terminal, es muy sencillo hacerlo desde ADB:
adb reboot
Además, podemos seleccionar dos tipos de reinicios adicionales:
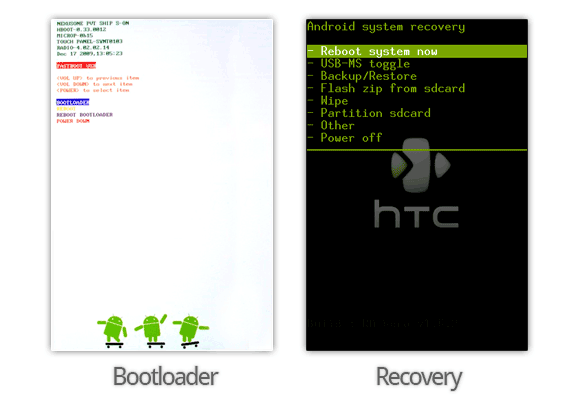
adb reboot bootloader
Bootloader es el cargador principal de Android, desde donde se pueden realizar varias operaciones con respecto al funcionamiento del terminal (cambio de firmware, etc...).
adb reboot recovery
Recovery es una especie de panel de recuperación, desde el cuál se pueden realizar tareas varias de recuperación, como puede ser particionamiento, wipes, flasheo, etc...
NOTA: No reiniciar en estos modos si no se sabe lo que se está haciendo. Se pueden realizar cambios que dejen al sistema operativo en un estado no funcional.

9. Remontar la partición del sistema

Otra de las tareas útiles, para aquellos que quieren adentrarse en el mundo del funcionamiento de Android es el de volver a montar la partición de sistema de Android con permisos de lectura y escritura, ya que en principio, sólo tiene permisos de lectura.
adb remount
Esto permitirá realizar cambios de escritura en la partición /system.

10. Ejecutar comandos en el entorno Android

Puesto que Android funciona con una base de kernel de Linux, es posible lanzar comandos en la terminal propia de android. Para ello podemos abrir una consola con el siguiente comando:
adb shell
O lanzar comandos directamente:
adb shell [comando]
Esto abre un amplio abanico de posibilidades (sobre todo para usuarios root) a los que propongo empezar con unos sencillos, para ir conociendo el sistema:
adb shell df -h
Que nos mostrará las particiones montadas y el espacio libre, entre otros datos. O por otra parte:
adb shell ls -lh /

Friday, October 16, 2015

Commands Windows shell

http://www.computerperformance.co.uk/vista/vista_shell.htm

Windows Vista Shell Commands - SendTo
Think of Vista's Shell as a special engine room.  To that thought add the concept 'command', as in command line, or 'dos box'.  Now all that you need for action is the name of the folder object, for example shell:sendto.windows vista shell:sendto
Get Started with Shell:SendTo
If you right-click a file, from the drop-down menu you have the option to SendTo a select group of folders.  Now, you may wish to add more locations to this SendTo list.  Strangely, normal explorer techniques won't give you access to the SendTo folder, this is a job for Vista's command, shell:sendto
Click on the Vista Start button
Click in the Start Search dialog box
Type -> shell:sendto
Result: Vista launches the Windows Explorer shell at the SendTo folder.  You are now in a position to add more shortcuts to the SendTo folder.
The command Shell:xyz acts as a shortcut to the folder you wish to find quickly, you just have to remember the key names to substitute for xyz.
More Shell:Commands
shell:cookies
shell:nethood
shell:PrintersFolder
shell:System
Incidentally, my friend 'Barking' Eddie has been amused by this shell command:
shell:SystemCertificates
  ?
Avoid the Space Trap
Shell:sendto is correct - no space
Shell:  sendto is wrong - you don't need a space
Shell :sendto does not work either, there must be no spaces.
Are the shell commands case sensitive?  No not all, just avoid that space.  These Vista Shell:Commands are merely a specialist way of accessing key folders.  You could find the very same information through Windows Explorer or by launching the Control Panel and drilling down through the sub-menus.
Full list of Vista Shell:Commands

AddNewProgramsFolder
Administrative Tools
AppData
AppUpdatesFolder
Cache
CD Burning
ChangeRemoveProgramsFolder
Common Administrative Tools
Common AppData
Common Desktop
Common Documents
Common Programs
Common Start Menu
Common Startup
Common Templates
CommonDownloads
CommonMusic
CommonPictures
CommonVideo
ConflictFolder
ConnectionsFolder
Contacts
ControlPanelFolder
Cookies
CredentialManager
CryptoKeys
CSCFolder
Default Gadgets
Desktop
Downloads
DpapiKeys
Favorites
Fonts
Gadgets
Games
GameTasks
History
InternetFolder
Links
Local AppData
LocalAppDataLow
LocalizedResourcesDir
MAPIFolder
My Music
My Pictures
My Video
MyComputerFolder
NetHood
NetworkPlacesFolder
OEM Links
Original Images
Personal
PhotoAlbums
Playlists
PrintersFolder
PrintHood
Profile
ProgramFiles
ProgramFilesCommon
ProgramFilesCommonX86
ProgramFilesX86
Programs
Public
PublicGameTasks
Quick Launch
Recent
RecycleBinFolder
ResourceDir
SampleMusic
SamplePictures
SamplePlaylists
SampleVideos
SavedGames
Searches
SendTo
Start Menu
Startup
SyncCenterFolder
SyncResultsFolder
SyncSetupFolder
System
SystemCertificates
SystemX86
Templates
TreePropertiesFolder
UserProfiles
UsersFilesFolder
Windows

Friday, September 25, 2015

Bass

Feel the bass

BASS

PXE boot server

http://www.rmprepusb.com/tutorials

76 - Quickly setup PXE booting to install any Windows OS or PXE boot linux, etc. with SERVA!

tumblr visitor

Other Tutorials you might like:


also checkout this free PXE software from Aomei Technology - easy to setup up but only supports one boot image at any one time. (thanks to 'Jack' for the heads up on this one!).

Introduction

A new utility has just appeared which makes installing Windows XP, 2003, Vista, Win 7, Win 8 or Win 2K8 via PXE very easy!

It is called Serva and can be found here. It does NOT require the Windows WAIK to be installed and is quite a small download - with it you can set up a RIS and WDS server on your Windows PC and you don't need to even touch any existing DHCP server or router!

The instructions are easy to follow, but here is what I did to get PXE booting and a Windows 7 install going in just 5-15 minutes!

Note: proxyDHCP PXE booting is explained here: http://blogs.technet.com/b/dominikheinz/archive/2011/03/18/dhcp-amp-pxe-basics.aspx

My Setup

I have a typical home network - an ADSL router which has four Ethernet ports (and a wireless aerial) and a Windows 7 PC. The target PXE boot PC was an Asus netbook.

                    Windows PC     <------>  Dlink ADSL router + 4 port hub <-------> any other PXE-boot capable computer
(Win 7 + Serva PXE & TFTP Server)                                                                                                          (PXE client)    


                    <-- color="#9900ff" font="" size="4">---------------->
    <------------------> 
           

Quick How To

1. Download Serva from the Serva website (the non-supporter version is free)

2. Run the download to unpack the files and copy the Serva files to any convenient folder on your Windows hard disk (you might like to make a link on your Desktop to the exe)
3. Create a C:\SERVA_ROOT empty folder

4. Run Serva.exe and click on the Settings button at the bottom (if you get a Windows FireWall warning then ALLOW the program access through the firewall)

5. Click on the TFTP tab and set the Root directory to C:\SERVA_ROOT and tick the TFTP Server box as shown below:


6. Click on the DHCP tab and set proxyDHCP (if you already have a DHCP server or DHCP router) and tick the BINL box. 

7. Quit the app and re-run the Serva.exe app again. This is necessary because when Serva re-starts it will generate the PXE download files according to what folders you have created. Serva only does this when it starts. If you make any changes to the folders under C:\SERVA_ROOT then you should always quit and re-run Serva before you try a PXE boot.

8. Check that there are now some folders underneath the C;\SERVA_ROOT folder

9. Set up a Windows share to the C:\SERVA_ROOT\WIA_WDS folder and after that, use the Windows Advanced Properties dialogue (click on the folder and then clickProperties - Sharing) to set access for Everyone and set the Share name to WIA_WDS_SHARE.

10. Copy the contents of your Windows 7 (or Win8 or Vista or Server 2K8R2) DVD to a new folder - e.g. copy a Win 7 SP1 32-bit install DVD toC:\SERVA_ROOT\WIA_WDS\Win7_32_SP1 

11. If you have more DVDs, just make a new folder for each of them under C:\SERVA_ROOT\WIA_WDS

12. If you have NT OS source files (e.g. 2003, XP or Server2K8 non-R2) then put these under C:\SERVA_ROOT\WIA_RIS and share the C:\SERVA_ROOT folder asWIA_RIS_SHARE (see doc on website). Make sure "Everyone" group has read permission on the just created share. You also need to set a Null Session share on the C:\SERVA_ROOT folder.

13. Quit the Serva app and re-run it

14. Now try to PXE boot your target system

15. For a WDS install (Vista, Win7,Win8, SVR2K8R2), you will be prompted for a username and password - use your host PC  computername\username and password - e.g. mynewHP\Administrator  myhppwd.

That's it - now try to PXE boot a system over Ethernet.

I would recommend using a Windows 7 or 8 32-bit install folder (copy of the install DVD) to start with as these will have the most network drivers in them already and will work on any CPU. The troubleshoooting documentation on the Serva website explains how to add OS network drivers if the standard Microsoft install files do not already contain the correct network driver for your target systems.

Troubleshooting

  • After connecting the network cable, watch the Windows SystemTray network icon - wait until the icon animation has stopped (usually 1-2 minutes) before you attempt to start Serva.
  • If you having problems, try disabling the Windows Firewall on your PC and temporarily stopping your Anti-Virus protection,.
  • If you are using a router as a hub, disconnect any other Ethernet cable except for the target PXE system and your Serva Windows PC.
  • Try a different PXE client notebook or PC - some PXE BIOSes are buggy (not all PXE BIOS ROMs support proxyDHCP PXE booting)!
  • If it starts to load the OS installation files and then stops with an error message - see here.
  • If you are installing XP and you just see the black screen with the XP logo, make sure you have set up the Share on the C:\SERVA_ROOT folder correctly and followed the Null Session share instructions.
  • If the client is having communication problems with the Serva host PC (e.g. PXE client is not receiving the DHCP offer or lots of timeouts, etc.) try switching off and on your router - if still no joy, switch off your host PC, client PC and router. Then switch on the router, wait 1 minute and the switch on your host PC. Now try again!

Note: grldr and grub.exe will not work if the PXE server is using proxyDHCP mode. Grub4dos does not currently support this feature. To use grub4dos your PXE server must also be the DHCP server (i.e. do not use proxyDHCP mode and disable your DHCP server services whilst Serva is running).

Use Oracle VM VirtualBox to PXE boot from Serva

You can PXE boot using Oracle VM Virtual Box to test that PXE booting is working. 

1. Add a new Virtual machine which has a virtual hard disk that you can install the OS onto.
2. Set up the Network Adapter to Bridged and set the Name to the physical network adapter on your host system (see below).


3. Run the VM and press F12 to get the BIOS boot option menu:

Press L to boot from the LAN. You should then see the Serva menu if PXE booting was successful:


Note that Windows XP will require the correct network driver to be added. See the Serva website for instructions.

You can now install XP or Win7 to your virtual hard disk (if you wish).


Win7 logon pop-up. You may need to add the correct Win 7 network drivers if they are not already in Win 7 WinPE.

Booting linux via PXE using SERVA

Please read here to see how to boot various linux distros using SERVA.

See here for booting Ubuntu with Serva 2.1.

cyberpunk

Gunship - Tech Noir

Monday, September 21, 2015

R&B + jartadas

C+C Music Factory - Gonna make you sweat (1991) 
"everybody dance now"


Black Box - Ride on time (1989)


Marky Mark and The Funky Bunch - Good Vibrations (D-JOG)


Technotronic - Pump Up The Jam

Salt-N-Pepa - Push It

Diana King - Shy Guy

Alexia - Uh la la la


Haddaway - What is love

Alexia - Number One


bakala
Xque - Pastis y Buenri sesión 1998


Antico - We need freedom (1991)

Rebeca - Duro de Pelar

Xavi Metralla - Diabolica (pont aeri)

Safri Duo - Played-A-Live

David Tavare - Hot Summer Night


Amanda Lear - Queen of Chinatown 1977